Lab 5 - DNA Sequencing
The purpose of this lab is to get some more practice with string operations as well as to get an idea of what kinds of data you can visualize in Python for your final projects.
Like last week, this is a group lab, and the lab will tell you when to switch off who is typing.
If you aren’t physically present in lab, you can complete the lab on your own time.
Background - Quick Bio Lesson
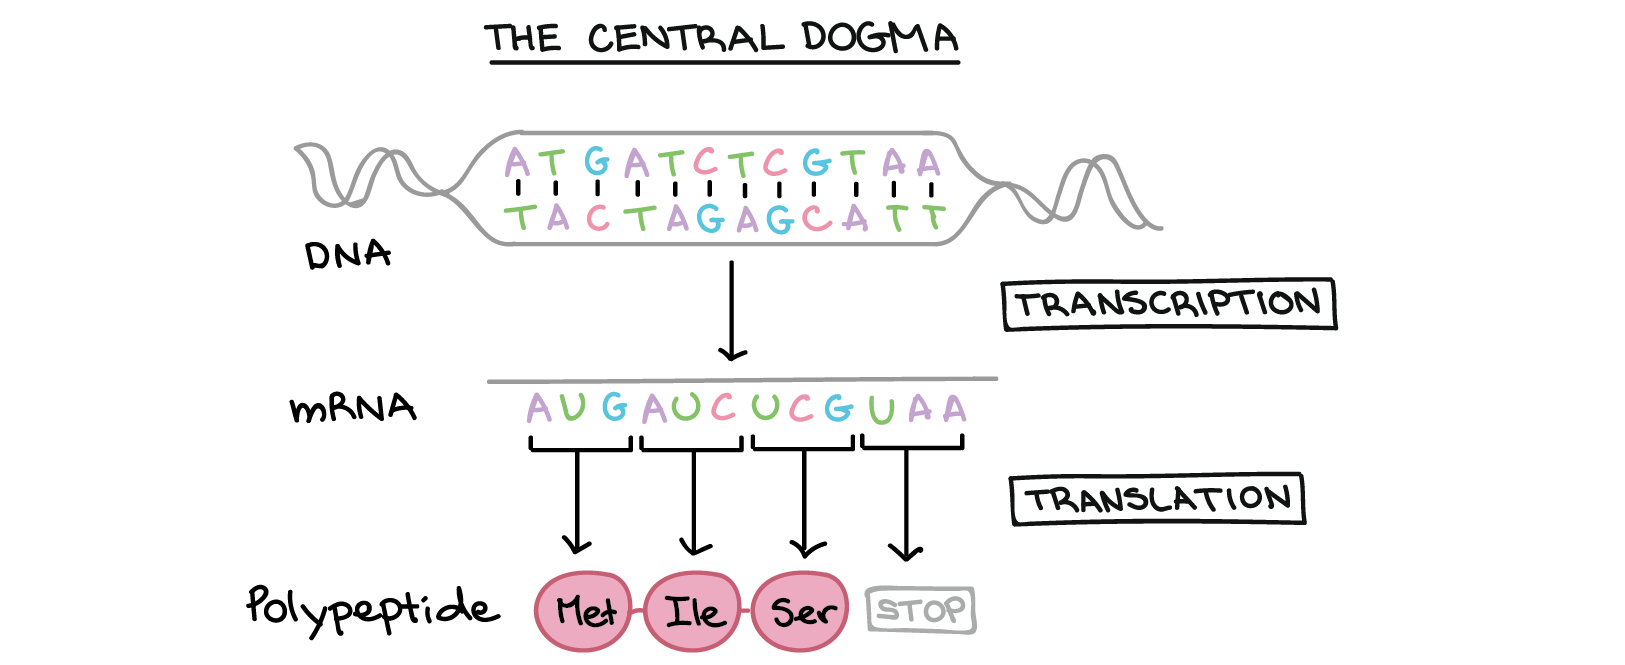
Our DNA is made up of sequences of four building blocks called nucleic acids, represented by the letters A, C, G, T. Sequences of these letters get read by our body’s machinery and transcribed first into RNA, which is represented by A, C, G, and U, and then translated into one of 20 amino acids. These amino acids are then used as building blocks for proteins, which perform various tasks inside our body to keep us alive.
The DNA to RNA step works as follows: Each letter ACGT has a complimentary letter UGCA (in that order). So, anywhere there is an A it becomes a U; anywhere there is a C it becomes a G; etc.
The RNA to Proteins step works as follows: There is a particular sequence of 3 letters that signals the start of the protein. Then each subsequent block of 3 letters has a corresponding amino acid. Finally, there is a sequence of 3 letters that signals the end.
Here is a diagram of this process:
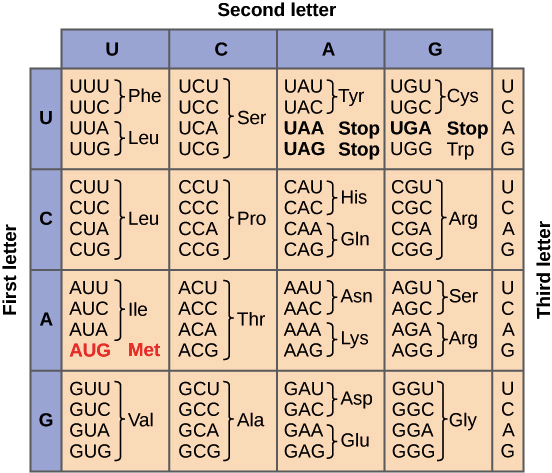
Here is a chart showing which 3 RNA letters correspond to which 3 amino acids.
This process means that if I give you a string of DNA, you can transcribe it into RNA, then into proteins. That is the goal of this lab.
Part 1: Sequencing
You’ll first need to translate the DNA into RNA, then the RNA into proteins.
Step 1: Generate a Sequence
First, at the top of your file, make sure to do:
import random
Then, following function will generate a random sequence of DNA for you that you can work with.
def generate_dna(tablenum):

    random.seed(tablenum)

    dna = ['A','C','G','T']

    seq = "".join(random.choices(dna, k=300))

    # replace start with a start codon
    seq = "TAC" + seq[3:]

    # replace any premature stop codons with non-stops
    seq = seq.replace("ATT", "CGG")
    seq = seq.replace("ATC", "GGC")
    seq = seq.replace("ACT", "GCG")

    # Add in a stop codon somewhere towards the end
    stops = ["ATT", "ATC", "ACT"]
    rand_end = 3 * (random.randint(250,300)//3)
    seq = seq[0:rand_end] + random.choice(stops) + seq[rand_end+3:]

    return seq
This function takes in as a parameter a random seed and returns a sequence of DNA for you to work with. You should set the random seed to your table number, so that every time you run the code, you get the same sequence; however, everyone’s sequence will be different.
You don’t have to edit anything about this function. You can copy it into your code and then use it just like you would a built-in function.
Step 2: DNA to RNA
To change DNA into RNA, you need to do the following:
- Everywhere there is an A, replace it with a U
- Everywhere there is a C, replace it with a G
- Everywhere there is a G, replace it with a C
- Everywhere there is a T, replace it with an A
Translate your string of DNA into RNA and save it as a new string.
Print this string.
Step 3: RNA to Protein
You should first switch who is typing.
To change RNA into proteins, it is a lot more complex. There are 64 possible combinations of nucleic acids to make up the amino acids. Each three-character sequence encodes a specific amino acid.
This is exactly a key-value pair, and so it is the kind of thing we’ll want a dictionary for.
I won’t make you write out a dictionary for this; I’m providing in here, and you can copy it in.
aa = {
    "UUU": "Phe", "UUC": "Phe", "UUA": "Leu", "UUG": "Leu",
    "UCU": "Ser", "UCC": "Ser", "UCA": "Ser", "UCG": "Ser",
    "UAU": "Tyr", "UAC": "Tyr", "UAA": "STOP", "UAG": "STOP",
    "UGU": "Cys", "UGC": "Cys", "UGA": "STOP", "UGG": "Trp",
    "CUU": "Leu", "CUC": "Leu", "CUA": "Leu", "CUG": "Leu",
    "CCU": "Pro", "CCC": "Pro", "CCA": "Pro", "CCG": "Pro",
    "CAU": "His", "CAC": "His", "CAA": "Gln", "CAG": "Gln",
    "CGU": "Arg", "CGC": "Arg", "CGA": "Arg", "CGG": "Arg",
    "AUU": "Ile", "AUC": "Ile", "AUA": "Ile", "AUG": "Met",
    "ACU": "Thr", "ACC": "Thr", "ACA": "Thr", "ACG": "Thr",
    "AAU": "Asn", "AAC": "Asn", "AAA": "Lys", "AAG": "Lys",
    "AGU": "Ser", "AGC": "Ser", "AGA": "Arg", "AGG": "Arg",
    "GUU": "Val", "GUC": "Val", "GUA": "Val", "GUG": "Val",
    "GCU": "Ala", "GCC": "Ala", "GCA": "Ala", "GCG": "Ala",
    "GAU": "Asp", "GAC": "Asp", "GAA": "Glu", "GAG": "Glu",
    "GGU": "Gly", "GGC": "Gly", "GGA": "Gly", "GGG": "Gly"
}
What you should do now is use this dictionary, along with your RNA, to create a list with each of the amino acids, in order. For example, if your RNA string was
rna = "GGGUUUAAA"
You should create a list which is
amino_acids = ["Gly","Phe","Asn"]
:key: Important! If you hit a stop codon, you should STOP translating. Don’t add anything else after that. You don’t have to add “STOP” to the list of amino acids either; you should simply stop. (If you do end up adding it to the list, that is okay.)
Finally, you should join the elements of that list with dashes to create your final amino acid string and print it.
Your final string in this case would look like this:
Gly-Phe-Asn
Part 2: Visualization
You’re now going to do a very simple visualization with this data you’ve collected.
What we want is a histogram showing the frequency of each amino acid. So, every time it appears in the sequence.
You have a list already of every time such an amino acid appears in this sequence, so we want to use that somehow. Python makes this very easy.
To the top of your file, add these import statements:
import matplotlib.pyplot as plt
Run your file. It’s possible at this point you will encounter the error “No module named matplotlib found” (or the same for numpy). In this case, in your terminal, type the following:
pip3 install matplotlib
Which should fix it.
Remember when we installed pip way back at the beginning of class? This is why!
Once you can successfully import matplotlib and numpy, it is pretty simple to get a histogram. All you have to do is the following:
plt.hist(your_list_name, bins = len(set(your_list_name)))
plt.show()
Where you are replacing your_list_name with whatever you called your list of the amino acids you found in your sequence.
For a slightly better look, you can add an optonal argument to plt.hist() to narrow the bars:
plt.hist(your_list_name, bins = len(set(your_list_name)), r=0.8)
Notice the axis labels still don’t quite match up. For your next homework, you’ll have another visualization problem where you’ll discover why this doesn’t give us exactly what we want it to look like.
Turning it In
When you turn in the lab, turn in both your py file and the histogram generated.