Lab 4 - Version Control with git and GitHub
This lab is adapted from a lab created by Dr. Joshua Nahum for CSE 232 at Michigan State University. Thanks, Josh!
Lab Assignment
For this lab you will need a partner. Choose someone at your table; you’ll work together for this lab whenever it mentions “partner”.
Introduction to Version Control with git and GitHub
One of the most important tools every software developer uses on a daily basis is version control. Version control is software that can track and share changes to a code base (repository) with others. “git” is the most popular of the version control systems and GitHub is the most popular online hosting site for git repositories.
Initial Setup
Make a free account on GitHub.com. Then complete the introductory tutorial named “Read the Guide”. In this tutorial, you will make a public repository. You can give it a fun name if you like.
⭐ Raise your hand to show me the merged pull request as directed by the tutorial
Collaboration
- Find your partner’s newly created repository on GitHub.
- Click the “Fork” button in the top-right of the repository page to make your own copy of their repository.
- Edit and commit changes to your copy of their repository. (Perhaps leave a nice compliment.)
- Click on the “New Pull Request” button and initiate a pull request for the changes you just made.
- Accept the pull request from your partner and confirm the changes made.
git
GitHub is a useful website for sharing git repositories with the wider world, but most or your work with version control will be on your local computer. For this part of the lab, you need to create a new private repository. Then click on the green “Clone or Download” button and select the “HTTPS” option. Copy the HTTPS URL to the clipboard (to be used later). This next part of the lab will be done in the terminal in VSCode; make sure VSCode is open to your folder for this class.
cdto the directory where you want a local copy of the repository to be placed.- Run
git clone https...where the link is the url you copied from your GitHub repository. - You should be prompted for your GitHub username and a personal access token (not your GitHub password). Follow these instructions to obtain a personal access token with “repo” permissions.
If you are prompted for your github password, you might have some github integrations installed in VSCode; that’s fine. Just read carefully to see if you’re being prompted for a personal access token or a password.
Next we need to give git some information about yourself.
- Run
git config --global push.default simple - Run
git config --global user.name "Your Name Here"where Your Name should be replaced with your actual name. - Run
git config --global user.email "blah@lawrence.edu"where the email should be replaced with your email.
Next we will make changes to the repository. Note: most git commands require your current working directory to be inside the the repository to work.
- Right click on the left-sidebar and refresh it to see the repository you cloned (it should be in a folder with the name of the respository).
cdinto the newly created repository folder.- Edit the README.md file to have your name in it (or create this file if it doesn’t exist). Save it.
- Run
git statusto have git inform you of any changes to the repo it detects. It should show you that the README file has changed. - Run
git add README.mdto instruct git that it should track that change. - Run
git commit -m "Changed the README"to have git save the changes to the history. You can replace the commit message with anything you like. - Run
git pushto have git share the commits (history) with the repo it was cloned from (the private repo on GitHub.) - If you refresh the repo page on GitHub, you should now see the changes you made to the README file.
- Run
git fetchto have git sync (download) any commits that have been made on the remote (Github) repository.
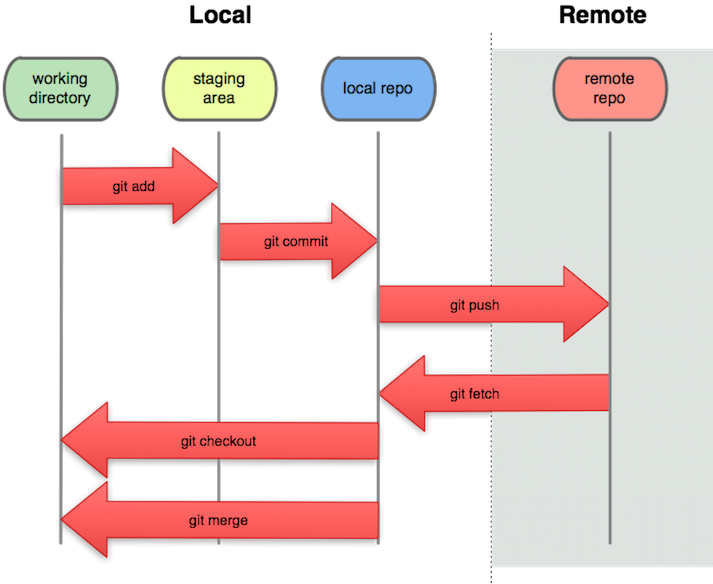
If you’d like a visual representation of what is happening here, here is a diagram of what these commands do and where they move work to be saved.

Adding Code to the Repo
This next part of the lab will involve you editing code in your repository.
- Find some code you wrote for a previous lab and add that to your repository (copy the
.javafile into the repository folder). - Run
git statusto confirm that git notices the presence of the project.cpp file. - Run
git add example.java(be sure to use the actual name for the file) and thengit commit -m "example added"to add and commit your example file.
Next you need to modify your code to demonstrate a new commit.
- Ensure your solution doesn’t have redundant or repeated code.
- Ensure that the variable and function names are clear and correctly spelled.
- Perhaps try moving some of your code into their own methods.
- Ensure that you have adequate comments for each function and explain complicated functionality.
Once you have improved your solution, you can add, commit, and push those changes to GitHub.
⭐ Show me your code and the git log in your local repository.
To turn in the lab, submit a link to your github account on Canvas under Lab 4.
Git Problems?
git is a complicated program with many working parts.
Without teaching you quite a bit more about how it works, it can be difficult to know how to fix certain problems.
But if your local repo is giving you trouble, one easy fix is to clone a new copy of the repo from GitHub and work with that one (make sure to copy and commit any changed files from the old repo before deleting it).